Resolving Rust Symbols
| 21 min read
Linking is the process of combining object files into an executable or shared library. It’s like putting together puzzle pieces to create a working program. The magic happens during symbol resolution, where the linker matches variable and function names (ie. symbols) to their specific memory addresses, making sure everything fits together.
Phases of Compilation

In compiled languages like C, C++, or Rust, a build step consists of two phases. In the first phase, a compiler compiles source files into object files (.o files). In the second phase, a linker takes all object files and combines them into a single executable or shared library file. Let’s try to understand linking in the context of Rust.
What does a Linker do?
- Resolves symbols in object files
- Combines object files into a single executable or shared library
- Resolves dependencies between object files
- Generates a symbol table for the final executable
Linking in Unix-like Systems
In Unix-like systems, the linker is typically ld (linker and loader). The linker is responsible for resolving symbols in object files and generating the final executable or shared library.
To understand this from a rust perspective, let’s setup a simple rust project. I’ll be switching back and forth between Linux and macOS, to compare and contrast things.
For the Linux VM, I’m using orbstack to create a “machine” on macOS which work like traditional vms, but shares the same kernel.
After setting up rust in the vm using rustup, we use cargo to create a new rust project.
$ cargo new learning-linkersLet’s try to build it.
$ cd learning-linkers && cargo buildCompiling learning-linkers v0.1.0 (/Users/shrirambalaji/Repositories/learning-linkers)error: linker `cc` not found | = note: No such file or directory (os error 2)Hmm, an error. We run into a linker `cc` not found error because the rust installer assumes that a C linker is already present, instead of checking for the necessary compiler toolchain.
On linux machines, the de-facto toolchain is gcc(GNU Compiler Collection) which seems to be missing. The default linker ld is part of gcc and hence needs to be installed (the first time). The build-essential meta package has gcc and a couple other packages:
$ sudo apt install build-essentialNOTE: On macOS, the new default linker is
ld-prime(since XCode 15) which is part of the Xcode command line tools. You can install it by runningxcode-select --install.
We can also choose a different linker like lldwhich is LLVM’s linker or mold. LLVMis another compiler toolchain like gcc, but aims to be modular. Mold is a more recent alternative and is several times quicker based on their benchmarks, especially on Linux.
We’ll come across LLVM again, because rustc relies heavily on LLVM during different stages of compilation.
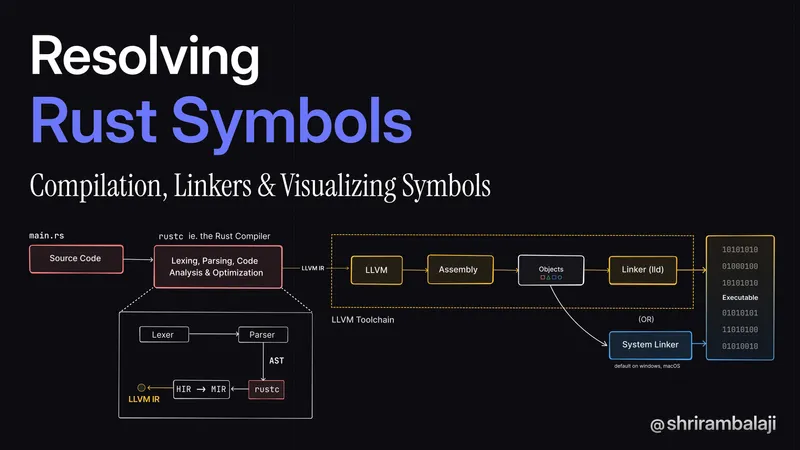
Rust Compilation Pipeline
To understand linking, it’s crucial to also know the rust compilation pipeline which involves a series of steps, from source code to executable.
As a sidenote, I’ve tried to document my understanding of the compilation, but it’s neither exhaustive nor a 100% accurate. rustc is much more advanced and uses a “query-based” approach ie. the steps / stages that you see below that appear to happen linearly may not occur that way.
Instead, the compiler can do on-demand updates to any stage in the compilation, where you can think of individual components within each stage to be mapped to a query ie. a memoizable pure function that can in-turn calls sub-queries based on what needs to be done. This query-based approach enables things like incremental compilation. The Rustc Dev Guide - Queries page might be a good starting point to understand Query-Based compilation.
For the sake of brevity, it’s all linear from now.
Lexing and parsing

The source code is analyzed by the lexer (rustc_lexer) as raw strings (&str) and converted into a stream of tokens. The tokens coming out from these are not parseable from the get-go and it only produces basic tokens.
The rustc_parse::lexer library takes care of making these tokens “wide” and parseable for the parser (rustc_parse) which takes in the stream of tokens and converts it into an Abstract Syntax Tree (AST).
Many language compilers / compiler-frontends operate on these fundamentals: source code as a string → tokens → parser → tree.
HIR & MIR
The AST from the previous step is lowered into a High-Level Intermediate Representation (HIR) which is a friendlier representation to work with. During lowering - rustc also needs to do a couple of things, before getting to the HIR:
- Name Resolution: Resolves import and macro names.
- Expanding Macros: The AST we have, has placeholders / todos for each macro that’s invoked. For eg. the
println!macro (yes, it’s a macro and not a function). In this step, every macro invocation is enqueued, then expanded into anASTFragmentorTokenStreamand merged back into the original AST and then dequeued.To put it simply, it’s like copying over the entire
println!macro defintion from thestdlibrary and pasting it in, into your source code. - Desugaring Syntax: Any syntactic sugar gets dissolved (ba dum tss!) into it’s basic form. (for eg. if let → match)
Then with the HIR, rustc does:
- Type inference ie. automatically deducing the types of variables and expressions
- Trait Solving → Finding the correct implementation of a trait for a type
- Type Checking → Converting HIR types (hir::Ty) to Rustc’s internal types (ty::Ty)
HIR is further lowered into a THIR(Typed HIR) and then further into an Middle-level Intermediate Representation (MIR), which is a more low-level representation. During this transformation, the compiler performs a lot of optimizations and does Monomorphization.
The MIR is where the mysterious (and commonly misunderstood and complained about) borrow-checker kicks in. The borrow-checker rules are validated here. Also, language servers like rust-analyzer seem to use the MIR for the same as well.
Monomorphization is the fancy term for generating specialized code for each type that a generic function is called with. This helps reduce the overhead of generics in Rust, and that’s why Rust is often referred to having “zero-cost abstractions”. But hey, let’s not forget, there’s no such thing as a free lunch. The cost is most likely paid during compilation.
Code Generation & Building the executable

After all the optimizations, the MIR needs to get ready for code generation. By default rustc uses LLVM for codegen, and hence the MIR is converted to LLVM Intermediate Representation (LLVM IR), which is what the LLVM Toolchain works with.
The LLVM project contains a modular, reusable & pluggable compiler backend used by many compiler projects, including the clang C compiler and rustc. LLVM IR is not really human readable (normies like me, skill issue tbh) but you can think of it as being close to assembly with additional low-level types and annotations added for optimizations.
Sidetracking: If you are curious about LLVM IR, click to see it for a simple program
pub fn sum(a: i32, b: i32) { a + b}$ rustc --emit=llvm-ir$ cat sum.ll; ModuleID = 'sum.3a6aa0f926c1c175-cgu.0'source_filename = "sum.3a6aa0f926c1c175-cgu.0"target datalayout = "e-m:o-i64:64-i128:128-n32:64-S128"target triple = "arm64-apple-macosx11.0.0"
@alloc_14e966bca779030b575586885e7465c7 = private unnamed_addr constant <{ [8 x i8] }> <{ [8 x i8] c"./sum.rs" }>, align 1@alloc_ab2262a4d4eeb403539f925733c0759f = private unnamed_addr constant <{ ptr, [16 x i8] }> <{ ptr @alloc_14e966bca779030b575586885e7465c7, [16 x i8] c"\08\00\00\00\00\00\00\00\05\00\00\00\05\00\00\00" }>, align 8
; Function Attrs: uwtabledefine dso_local i32 @sum(i32 %a, i32 %b) unnamed_addr #0 {start:%0 = call { i32, i1 } @llvm.sadd.with.overflow.i32(i32 %a, i32 %b)%_3.0 = extractvalue { i32, i1 } %0, 0%_3.1 = extractvalue { i32, i1 } %0, 1%1 = call i1 @llvm.expect.i1(i1 %_3.1, i1 false)br i1 %1, label %panic, label %bb1
bb1: ; preds = %startret i32 %_3.0
panic: ; preds = %start; call core::panicking::panic_const::panic_const_add_overflowcall void @_ZN4core9panicking11panic_const24panic_const_add_overflow17h2a3701a832247fcdE(ptr align 8 @alloc_ab2262a4d4eeb403539f925733c0759f) #4unreachable}
; Function Attrs: nocallback nofree nosync nounwind speculatable willreturn memory(none)declare { i32, i1 } @llvm.sadd.with.overflow.i32(i32, i32) #1
; Function Attrs: nocallback nofree nosync nounwind willreturn memory(none)declare i1 @llvm.expect.i1(i1, i1) #2
; core::panicking::panic_const::panic_const_add_overflow; Function Attrs: cold noinline noreturn uwtabledeclare void @_ZN4core9panicking11panic_const24panic_const_add_overflow17h2a3701a832247fcdE(ptr align 8) unnamed_addr #3
attributes #0 = { uwtable "frame-pointer"="non-leaf" "probe-stack"="inline-asm" "target-cpu"="apple-m1" }attributes #1 = { nocallback nofree nosync nounwind speculatable willreturn memory(none) }attributes #2 = { nocallback nofree nosync nounwind willreturn memory(none) }attributes #3 = { cold noinline noreturn uwtable "frame-pointer"="non-leaf" "probe-stack"="inline-asm" "target-cpu"="apple-m1" }attributes #4 = { noreturn }
!llvm.module.flags = !{!0, !1}!llvm.ident = !{!2}
!0 = !{i32 8, !"PIC Level", i32 2}!1 = !{i32 7, !"PIE Level", i32 2}!2 = !{!"rustc version 1.79.0 (129f3b996 2024-06-10)"}After looking around for a bit, this is what I understood: The highlighted block contains the sum function that we defined earlier. @llvm.sadd.with.overflow.i32 calls an LLVM intrinsic function that performs signed addition between %a and %b. I think %_3.0 = extractvalue { i32, i1 } %0, 0 extracts the result of the addition, and the @llvm.expect.i1 is a compiler hint mentioning that addition overflow is false. If there is no overflow in addition, ret i32 %_3.0 returns the result.
If you want to actually understand LLVM IR better, this is a wonderful read.
The LLVM IR is then passed onto the LLVM backend (also called LLVM), which does a bunch of fancy optimizations on it, spitting out assembly code packed into something like an ELF object or wasm, based on the target. I’d likely to understand what happens in LLVM to some more depth at some point, but needed to avoid going into this rabbit hole to save myself.
This is where the Linker comes in and links all the different libraries and binaries together to create the final executable.
whew, that was a lot of information - back to linking!
Rust 🤝 Static Linking
Rust is a systems language, so obviously our expectation is to be similar to C - right? Just let me compile and give me an object file that I can link to later? That’s called dynamic linking and that’s the default of how things work with C, C++.
By default, Rust prefers the opposite - called static linking wherein it will link in all Rust and native dependencies, producing a single distributable binary.
NOTE: A crate is a unit of compilation and linking, as well as versioning, distribution, and runtime loading. A crate contains a tree of nested module scopes.
The default crate-type is bin for binaries and lib for libraries. The bin crate type is used for creating executables, and the lib crate type is used for creating libraries. The crate-type attribute in the Cargo.toml file can be used to specify the crate type or it can be specified using the --crate-type flag.
I mentioned that rust prefers static linking, but obviously it doesn’t mean that there are no .o files. However, it’s not as straightforward as C. This is what’s different:
rustc(invoked internally bycargo) compiles rust source code into an executable or a library (.rlib), rather than separately compiling to an object file and then linking them ie. it tries to do both the phases (compilation and linking) we discussed earlier in one step.rustcviews a crate as the basic unit of compilation, not files. hence, it typically compiles an entire crate at once.
In case of the bin crate the .o files are present inside the /target/debug/incremental/* directories when we run cargo build. These object files are particularly difficult to visualize, because they are part of rust’s incremental compilation ie. it compiles parts of a crate / project that have changed since the previous build. These are typically managed by rustc and cargo internally, so we need to find a way to get the .o files ourselves.
What’s inside the .o file?
But, before we get to linking - we saw object files being emitted right before it. I was a bit intrigued to know what’s in them. We can use the --emit=obj file to instruct rustc to emit object files.
Let’s understand this with an example, we have two files foo.rs and bar.rs which we will try to compile and link manually. The functionality is simple - we have a global variable Global which is modified by two functions foo and bar.
#![no_main]
#[no_mangle]pub static mut Global: i32 = 5;

#[no_mangle]pub fn foo() {  unsafe {    Global = 10;  }}
The #![no_main] attribute is straightforward, it tells the compiler that there is no main function, and effectively not to throw a compiler error when it doesn’t find one. If we have a main function, the .o file will contain a symbol for the main function and all of its linked dependencies. We want to avoid that for now so that visualizing the symbol table is easier.
unsafe block tells the compiler that whatever is inside it puts the onus on the programmer to ensure memory safety. In this case, we are modifying a global variable from two different functions, which is not safe in Rust.
The #[no_mangle] attribute
#[no_mangle]pub static mut Global: i32 = 5;When Rust code is compiled, identifiers are “mangled” ie. transformed into a different name to include additional information.
For example, with mangling enabled (ie. by default) the above foo Global variable gets mangled to __ZN11foo6Global17ha2a12041c4e557c5E. This is done to avoid naming conflicts when linking with other libraries, however we disable it with #[no_mangle] so that the symbol name is preserved, and can be easily linked by name.
Here’s, bar.rs:
#![no_main]
#[no_mangle]extern "C" {    static mut Global: i32;    fn foo();}
#[no_mangle]pub extern "C" fn bar() {    unsafe {        Global = 20;    }}
The extern "C" block tells the compiler that the function or variable is defined elsewhere. You may wonder why it’s extern C, and that’s not because we are inter-operating with C, but rather the ABI (Application Binary Interface) that the function or variable uses. In this case, it’s the C ABI. I also got to know that Rust has its own internal ABI, but it’s not stable - one of the main reasons I understood is that guaranteeing an ABI means optimizations in terms of field ordering / packing cannot be done. Some more reasons on what having a stable ABI means:
“It’s technically not just about field ordering, although this is the easiest thing to point out. But ABI also includes function call conventions (which registers are used for what, how parts of the stack are prepared for the function call…), and also layout of implicit structures such as closures and v-tables.”
As much as I didn’t want to use unsafe for such a trivial example, any FFI (Foreign Function Invocation) that goes through the “C” ABI cannot be safe. Let’s think about why FFI needs to be unsafe for a second? What would happen if we have an FFI invocation on some C code, that can potentially be changed by another thread? All hell would break loose (not really, but ykwim). This is why all safety guarantees are off.
Now, let’s compile these files and emit object files to link them later.
$ rustc --emit=obj -o foo.o foo.rs$ rustc --emit=obj -o bar.o bar.rsNOTE: This isn’t how you would typically compile a rust program, and it is recommended to use
cargo. We are enduring the pain of callingrustcjust so that we can try to manually link them.
Symbols - A Deep Dive
Object files have these teeny-tiny things packed into them, called symbols. We mentioned earlier what symbols are, so let’s take a deeper look.
Symbols (for eg. function names, variables) are stored in sections of the object file in a specific format - ELF (Executable and Linkable Format) on Unix-like systems. On macOS, it’s Mach-O (Mach Object) but similar to ELF.
This is how the sections are typically organized in an ELF object file:

source: CS 361 Systems Programming by Chris Kanich
Apart from these sections, there are pseudo sections like “Common” and “Undefined”, which we’ll come across later.
Alright, let’s take a peek into the object file, specifically the symbol table. Symbol table is a data structure that contains a list of symbols and their addresses.
In Linux, we can use the readelf utility which can read the elf file (duh!), and outputs the sections in the object file. For viewing the symbol tables on linux, we can run:
$ readelf -sW foo.o
Symbol table '.symtab' contains 9 entries:   Num:    Value          Size Type    Bind   Vis      Ndx Name     0: 0000000000000000     0 NOTYPE  LOCAL  DEFAULT  UND     1: 0000000000000000     0 FILE    LOCAL  DEFAULT  ABS foo.a147f3978a9294fa-cgu.0     2: 0000000000000000     0 SECTION LOCAL  DEFAULT    3 .text.foo     3: 0000000000000000     0 NOTYPE  LOCAL  DEFAULT    3 $x.0     4: 0000000000000000     0 NOTYPE  LOCAL  DEFAULT    5 $d.1     5: 0000000000000000     0 NOTYPE  LOCAL  DEFAULT    6 $d.2     6: 0000000000000000     0 NOTYPE  LOCAL  DEFAULT    8 $d.3     7: 0000000000000000    20 FUNC    GLOBAL DEFAULT    3 foo     8: 0000000000000000     4 OBJECT  GLOBAL DEFAULT    5 Global
For some reason, when I use the Linux VM to visualize the symbol tables, the addresses are always
0000000000000000. I’m not sure why this is the case, but I’ll try to figure it out. I’ll update this section once I figure it out.
From the output, we can infer:
- Global Symbols:
foo: A global function of size 20 bytes, defined in section.text.foo(index 7).Global: A global object namedGlobalof size 4 bytes since it’s ani32(index 8).
- Local Symbols:
- Several local symbols (e.g., $x.0, $d.1, $d.2, $d.3) without specific types, which are typically used for internal purposes by the compiler.
- File Symbol:
foo.a147f3978a9294fa-cgu.0: Represents the object file itself.
- Section Symbol:
.text.foo: Represents a text section specifically for the foo function.
However, readelf is not available on macOS, so we have to use the nm command to list the symbols in the object file. The nm command is a simpler utility that displays just the symbol table of an object file.
$ nm foo.o0000000000000010 D _Global0000000000000000 T _foo0000000000000000 t ltmp00000000000000010 d ltmp10000000000000018 s ltmp2The output of nm is in the following format:
D- Global Data section symbolT- Global Text symbold- Local symbol in the data sections- Unitialized Local symbol for small objects
If you haven’t noticed, lowercase denotes local symbols, and uppercase denotes global symbols. The ltmp symbols are temporary symbols generated by the compiler during compilation.
Let’s take a look at the symbol table for bar.o as well:
$ nm bar.o U _Global0000000000000000 T _bar0000000000000000 t ltmp00000000000000018 N ltmp1wherein U denotes an Undefined symbol. Remember, the Undefined pseudo section I was mentioning, that’s where the Global symbol exists. This is because there’s an undefined symbol reference to the Global variable, which will be resolved only during the linking phase.
Rules for Symbol Resolution
In the context of linking, there are two types of symbols:
- Strong Symbol: Defined directly in the object file, like
fooinfoo.o. - Weak Symbol: Referenced but not defined, such as
Globalinbar.o.
Resolution rules:
- Simple: The linker prioritizes strong symbols over weak ones. Duplicate strong symbols cause errors, while duplicate weak symbols lead to the first encountered being used.
- Complex: For strong symbols with the same name but differing attributes (e.g., array sizes), the linker chooses the most fitting one but issues a warning.
Okay, enough about symbols. Let’s move on to linking.
Linking everything together
Lets make a main.rs that calls the foo and bar functions.
extern "C" {    fn foo();    fn bar();    static mut Global: i32;}
fn main() {    unsafe {        foo();        bar();        println!("Global: {}", Global);    }}
Let’s compile the main.rs file and emit an object file like before:
$ rustc --emit=obj -o main.o main.rsNow, we have three object files - foo.o, bar.o, and main.o. We can try to link them together using the ld command.
$ ld -o main main.o foo.o bar.oUndefined symbols for architecture arm64: "__Unwind_Resume", referenced from: __ZN4core3ops8function6FnOnce9call_once17h8d9269e11286ae65E in main.o "__ZN3std2io5stdio6_print17h64cfa4dfe0b98263E", referenced from: __ZN4main4main17hbaae107db22ed0edE in main.o "__ZN3std2rt19lang_start_internal17hecc68fef83c8f44dE", referenced from: __ZN3std2rt10lang_start17h7f115bc16de7616dE in main.o "__ZN4core3fmt3num3imp52_$LT$impl$u20$core..fmt..Display$u20$for$u20$i32$GT$3fmt17h1e3b114d9d6ad45bE", referenced from: __ZN4main4main17hbaae107db22ed0edE in main.o "__ZN4core9panicking9panic_fmt17hc2b459a5bd3dce66E", referenced from: __ZN4core3fmt9Arguments6new_v117h192cc39b0503663bE in main.o "_rust_eh_personality", referenced from: /Users/shrirambalaji/Repositories/learning-linkers/src/main.o "dyld_stub_binder", referenced from: <initial-undefines>ld: symbol(s) not found for architecture arm64Narrator Voice: It was at this moment, he realized he can’t link them.
Oh no, a linker error! If you squint at the mangled error message, it seems like a symbol reference to core::ops::FnOnce::call_once is undefined. We need to link the core crate to resolve this error. But, we can’t just link the core crate, because it’s not a .o file, but a .rlib file. As far as I know, there’s no way to directly link a .rlib file with ld nor is it straightforward to link it with rustc.
I believe there’s an alternative way: adding the [no_std] attribute in main.rs, which instructs the compiler not to link the std crate. This is useful when we want to create a freestanding binary without the std library, for eg. when you are creating an OS. We would also need to implement the eh_personality language item, and implement our own panic handler. I don’t think this is necessary to understand linking and I don’t want to forego my precious std lib, so let’s try a different approach.
staticlib to the rescue
--crate-type=staticlib, #![crate_type = "staticlib"]- The purpose of this output type is to create a static library containing all of the local crate’s code along with all upstream dependencies - Linkage
Instead of us trying to link the core crate and bring in std dependencies ourselves, we can create a static library from the foo.rs and bar.rs files, and then link them manually:
# create a directory to store the output$ mkdir -p target/out$ rustc --crate-type=staticlib -o target/out/libfoo.a foo.rs$ rustc --crate-type=staticlib -o target/out/libbar.a bar.rsThe output is a .a file, which is a static library / archive in *nix systems. The archive .a file contains the .o files we saw above (along with other obj files required for the program), and we can take a quick peek. We use the ar command to list the contents of the archive.
$ ar -t target/out/libfoo.a | grep foofoo.foo.730f9a7e513a85b2-cgu.0.rcgu.ofoo.10ftosr6tvdwscdu.rcgu.oInterestingly the .a file contains the .o files we saw earlier, but with a different name, specifically with *.rcgu.o suffix. The rcgu stands for “Rust Codegen Unit” and is a unit of code that the compiler generates during Code Generation phase.
If we extract the .o file and look, we can see the same symbols we saw earlier.
$ ar -x target/out/libfoo.a foo.foo.730f9a7e513a85b2-cgu.0.rcgu.o$ nm foo.foo.730f9a7e513a85b2-cgu.0.rcgu.o0000000000000010 D _Global0000000000000000 T _foo0000000000000000 t ltmp00000000000000010 d ltmp10000000000000018 s ltmp2Using cargo to build the project
Up until now, we’ve been manually compiling and linking the files. But, we should ideally use cargo. Cargo is the build system and package manager for Rust. Additionaly, cargo lets us run a build script before building the project. The build script is a Rust file called build.rs that goes in the project’s root.
fn main() { println!("cargo:rustc-link-search=native=target/out"); println!("cargo:rustc-link-lib=static=foo"); println!("cargo:rustc-link-lib=static=bar");}cargo:rustc-link-search=native=target/outinstruction tells the compiler to search for the static libraries in thetarget/outdirectorycargo:rustc-link-lib=static=fooandcargo:rustc-link-lib=static=bartells the compiler to link thefooandbarstatic libraries. As an alternative to the linking these in the build script, we can also use the#[link](https://doc.rust-lang.org/reference/items/external-blocks.html#the-link-attribute)attribute directly inmain.rs
#[link(name = "foo", kind = "static")]#[link(name = "bar", kind = "static")]extern "C" { fn foo(); fn bar(); static mut Global: i32;}NOTE: The linking order can be important sometimes. In this case,
bardepends on theGlobalvariable infoo.rs, so we linkfoofirst andbarlater. Traditional unix linkers used to go from left to right, and resolve symbols in the order they are specified. If there are no references to a symbol mentioned later, it will be discarded. AFAIKldis “smart” enough to handle this, but it’s good to be aware of this.
Now, we can compile the project with cargo build and it should link the static libraries. Actually, we can even add the previous rustc commands to run in the build script so that we can just run cargo build to compile the project instead of manually compiling foo and bar. The final build script looks like this:
use std::process::Command;
fn main() {    // rerun if foo.rs or bar.rs changes    println!("cargo:rerun-if-changed=src/foo.rs");    println!("cargo:rerun-if-changed=src/bar.rs");
    // creates the output directory in target/out    std::fs::create_dir_all("target/out").unwrap();
    // Compile foo.rs and bar.rs into a static library    Command::new("rustc")        .args(&[            "--crate-type=staticlib",            "src/foo.rs",            "-o",            "target/out/libfoo.a",        ])        .status()        .unwrap();
    Command::new("rustc")        .args(&[            "--crate-type=staticlib",            "src/bar.rs",            "-o",            "target/out/libbar.a",        ])        .status()        .unwrap();
    println!("cargo:rustc-link-search=native=target/out");    println!("cargo:rustc-link-lib=static=foo");    println!("cargo:rustc-link-lib=static=bar");}
Let’s build it:
$ cargo build Finished `dev` profile [unoptimized + debuginfo] target(s) in 0.04sYay! It compiled successfully, which means the linking was successful. We can run the binary with cargo run to see the output.
$ cargo run Finished `dev` profile [unoptimized + debuginfo] target(s) in 0.00s Running `target/debug/learning-linkers`Global: 20The output Global: 20 means that the foo and bar functions were called successfully and the Global variable was modified by both functions (Global was original set to 5).
Conclusion
Writing this article was an immense learning for me, to try and understand linking in Rust, starting from the basics of linking in Unix-like systems, symbol resolution, what’s inside an ELF format .o file, understanding the Rust compilation pipeline, and finally linking static Rust libraries manually.
Thanks for reading! Please feel free to reach out on twitter: @shrirambalaji if you would like to provide feedback. I’m always open to learning new things.
All the code samples, articles and videos I used for research are linked below in the References section.
Until next time 👋
References
- Code Snippets on Github
- CS 361 Systems Programming by Chris Kanich
- High Level Compiler Architecture - Rustc Guide
- The Rust Borrow Checker - A Deep Dive by Nell Shamrell-Harrington
- Linkage - Rust Reference
- Visualizing Rust Compilation
- Manually linking Rust binaries to support out-of-tree LLVM passes
- nm man page
- Freestanding Rust Binary - Writing an OS in Rust by Philipp Oppermann
- Rules for Symbol Resolution
- A Gentle Introduction to LLVM IR